Check for National Data Opt-outs Service
This service is provided to help you comply with national data opt-out policy.
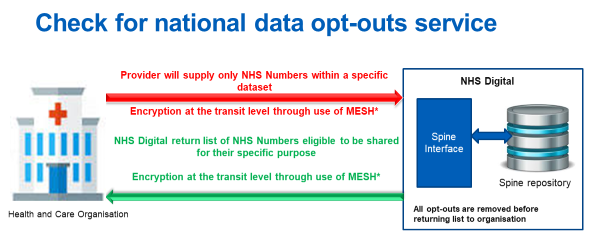
Use the secure Message Exchange for Social Care and Health (MESH) to send lists of NHS numbers to be checked against the national data opt-out repository on the Spine. The service will remove those with opt-outs. You'll get back a list of NHS numbers for the records you can use or disclose for planning or research.
National Data Opt Out Roll Out
NHS organisations have responsibility for making sure that they comply with the national data opt-out policy and are expected to be compliant from 1 August 2022.
Health and Care organisations must provide NHS Digital with their roll out plan detailing the scope of use, frequency and go live dates. This is mandatory for all organisations.
To notify NHS Digital of your roll out plans please contact [email protected].
This guidance is for those working in organisations that use or disclose data that falls within the scope of national data opt-out policy. The Check for National Data Opt-outs Service can be used by health and care organisations to check for opt-outs before using or disclosing data. The service requires access to the Message Exchange for Social Care and Health (MESH). The information below describes how to access MESH and how to use MESH to check for national data opt-outs.
GP practices only
GP IT system suppliers are implementing the Check for National Data Opt-outs functionality within their clinical systems. GP practices only need to install the MESH service separately if they disclose data outside their clinical systems.
Set up MESH
MESH is NHS Digital's secure messaging service. It supports two-way transfer of data between NHS Digital and health and care organisations. Data is fully encrypted during transit. Find more information about MESH.
The Check for National Data Opt-Outs Service uses MESH to allow users to send a data file containing a list of patient NHS numbers. The service then returns an updated version of the data file with the NHS numbers of those who have opted out removed.
You'll need to access MESH via one of the three different routes listed below. The choice will depend upon your organisational resources and needs:
- MESH User Interface (UI): capable of sending files up to 100MB and can be accessed using either NHS Smartcard (HSCN/N3 access) or password and pin code (internet access) - is the most user-friendly route to access MESH
- MESH client: capable of sending files up to 20GB, however does require software installation
- MESH Application Programme Interface (API): capable of sending files up to 20GB, configurable to current IT systems, however requires advanced technical team to implement
Find more information on our Compare MESH services webpage.
In most cases system suppliers or IT administrators will handle the set-up of MESH for each organisation. End users should get in touch with their organisation's IT contacts with any questions about setting up the service, including installation, access rights or running the MESH client.
Existing MESH users
Organisations should have separate mailboxes for each use case to maintain the security of the data being sent and received
For all types of MESH, you'll require a MESH mailbox set-up to use the Check for National Data Opt-outs Service. When completing the mailbox request form, please state “National Data Opt-Out Service (Workflow Group: POS” when asked what type of data will be sent/received via MESH. The file size is asked to ensure you are accessing MESH via the correct route for your needs.
If you decide to use a new mailbox with an existing client, please ensure you edit the configuration file, meshclient.cfg. Discover how to use multiple mailboxes for one MESH client installation.
Once you have set up your MESH access as required, then follow the steps below to create the file to be able to send it.
Before using the service, please review the Check for National Data Opt-outs licence agreement, which notes the rights and conditions upon which your organisation may use the Check for National Data Opt-outs service provided by NHS Digital.
Create the .dat file of patient data to send
Once you have access to MESH (UI/client/API) you can use it to send lists of NHS numbers to be checked and receive amended lists back. To create the file to send, follow the advice below:
Create the file in Microsoft Excel or similar
The file must only contain a list of NHS numbers, each followed by a comma and a carriage return (including the final one). Including any other details will stop the file being processed. See an example of a data file containing dummy NHS Numbers.
The file name must be unique. A suggested format is your mailbox ID, the date the file is produced, and a 4-digit sequence number to show what order that file has been produced in that month, each separated by hyphens.
For example, an organisation with MESH mailbox ID YCLTA53, that had produced a file on 7 February 2019 and which was the fifth file produced that month, would have the file name:
YCLTA53-070219-0005.dat
Rename files created with a .csv (or other) extension type to a .dat file. So, if your file is YCLTA53-07022019-0005.csv, you should rename the file to be YCLTA53-07022019-0005.dat.
This .dat file is now in the format ready to send via any type of MESH (UI/client/API).
Send and receive your file over MESH UI
Once you have your file ready to send, follow the instructions in this section detailing how to send and receive files over MESH UI. If you are using MESH client/API, please refer to the next section for guidance.
Sending the file over MESH UI
Once the file is created, open the Spine Portal. Authenticate using either an NHS Smartcard (for N3/HSCN access) or a password and PIN number (for internet access).
From the National Health Service Spine Portal screen, select “LAUNCH MESH USER INTERFACE”, which will take you through to your mailbox. You can switch between your inbox and sent files using the tabs to the left of your page.
Files received will appear under the “inbox” tab, on the bottom section of the screen.
To send a file, select the “New message” icon to the top left of the main screen. Then:
- select the correct message type
- select the Workflow as 'Workflow Group: POS (which includes workflowID: SPINE_NTT_UPHOLDING)
- select the recipient of mailbox ID X26HC065
- attach the file you created above (saved as a .dat file type)
- ensure that in the additional information section you fill in the message subject and message reference with unique identifiers (avoiding special characters like *!/\ )
Then click “submit” to send the message.
Only one file can be sent at a time. You can send up to 100MB in one file, and files are kept in an inbox for 5 days before being removed. Organisations are responsible for collecting received files and managing their inbox.
Send and receive your file over MESH client/API
Once you've configured your MESH client you can use it to send the file of patient data to be checked. If you're using MESH UI (smartcard access), refer to the guidance in the section above.
To make a submission over MESH client/API you require two files. The previously mentioned data file (.dat) and a control file (.ctl).
Refer to the information in our MESH client user guide for a .ctrl template and details of how to send and receive messages over MESH, whilst taking into consideration the National Data Opt-Out specific details below.
Creating and sending your files for National Data Opt-Out
The data (.dat) file you created earlier on this page is the .dat file mentioned on the user guidance page. You do not need to create another.
For the .ctl file:
-
the <WorkflowId> is: SPINE_NTT_UPHOLDING
- the <ToDTS> is: X26HC065
- the <Subject> is: a unique identifier you can choose yourself
- the <LocalId>is: a unique identifier you can choose yourself (we suggest prefixing with your ODS code and a timestamp, and avoiding special characters like *!/\)
We suggest having a local ID, as files returned relating to your outbound file will contain the same local ID, allowing you to match returned files to the original outbound files.
If the MESH client has not been set to automatically run as a service (if it's not in the start-up services enabled on your computer) then after placing the files in the OUT folder you will need to run the MESH Client.
Receiving files
Files sent back from the service will be placed in the IN folder, along with an updated control file.
The Check for National Data Opt-outs Service usually takes up to one hour to get a processed file back after you send it. However, in some cases, this may take several hours depending on the amount of data being processed.
If a control file has been completed incorrectly it will be moved to the FAILED folder along with the respective data file. You should check this folder periodically for files that could not be sent via MESH.
A new additional MESH message will also be sent to the sending MESH mailbox to inform that the processing job has been created for the submission. This message is comprised of two files (.dat and .ctl) and states that a job has been created in POS to clean the supplied file.
Provided the service has been able to process the file successfully, it will return a data file with an updated list of NHS numbers - with any that had a national data opt-out recorded removed from the list. This will be placed in the IN folder along with an updated control file.
The returned control file will have a blank subject field but will include a status record which confirms the transfer of the file back to the organisation. The <status> should read “SUCCESS”. If it does not, refer to the MESH client user guide for information on the types of error codes and how to resolve them.
Test the service
We've created a small set of test NHS numbers you can test with in both the INT and LIVE environment. You should not use dummy NHS numbers from your own systems, as the service will not recognise them.
There are 20 test NHS numbers available in Spine Integration environment, ten of which have a national opt out registered. The test NHS numbers are shown below, together with some of the associated demographic details and the opt-out status.
|
NHS_NO |
DOB |
FAMILY_NAME |
TITLE |
GENDER |
Opt-out Registered |
|---|---|---|---|---|---|
|
9694116414 |
26/01/1996 |
BEYER |
MR |
Male |
Yes |
|
9694116422 |
24/10/1986 |
RANCE |
MR |
Male |
Yes |
|
9694116430 |
26/08/1993 |
VAISH |
MR |
Male |
Yes |
|
9694116449 |
29/08/1990 |
HUYTON |
MRS |
Female |
Yes |
|
9694116457 |
26/09/2001 |
PENDLETON |
MS |
Not known |
Yes |
|
9694116465 |
21/05/1996 |
GRANT |
MISS |
Female |
Yes |
|
9694116473 |
01/07/2000 |
REID |
MRS |
Female |
Yes |
|
9694116481 |
31/01/1982 |
BRODIE |
MRS |
Female |
Yes |
|
9694116503 |
24/02/1992 |
HAND |
MS |
Female |
Yes |
|
9694116511 |
19/10/1989 |
GEMMEL |
MS |
Indeterminate |
Yes |
|
9694116538 |
15/09/1993 |
JONES-PERROTT |
MS |
Not known |
No |
|
9694116546 |
23/10/1995 |
GRAVES |
MISS |
Female |
No |
|
9694116554 |
24/07/2003 |
PALMAS |
MISS |
Female |
No |
|
9694116562 |
16/04/1988 |
HAINES |
MRS |
Female |
No |
|
9694116570 |
10/08/2003 |
LAPPIN |
MRS |
Female |
No |
|
9694116589 |
13/03/1989 |
SOLAN |
MR |
Male |
No |
|
9694116597 |
01/05/1993 |
WADE |
MRS |
Female |
No |
|
9694116600 |
01/03/1990 |
VESSEY |
MS |
Female |
No |
|
9694116619 |
24/09/1986 |
LOMAX |
MS |
Indeterminate |
No |
|
9694116627 |
13/03/1986 |
DERRY |
MISS |
Female |
No |
For users/suppliers who would like to access the test environment, the POS service uses the Spine Integration environment (INT). Details of this environment can be found on the NHS Digital Path-to-Live Environments webpages. This page includes Primary URLs and Java Keystores to use if using the MESH client.
When using the Integration environment, the POS MESH mailbox is:
- X26OT154
There are 15 test NHS numbers available in the live environment, four of which have a national data opt-out registered. The test NHS numbers are shown below, together with some of the associated demographic details and the opt-out status.
|
NHS_No |
DoB |
Age |
GENDER |
FAMILY_NAME |
TITLE |
Opt-out Registered |
|---|---|---|---|---|---|---|
|
9990536627 |
20050203 |
14 |
Female |
XXTESTPATIENT-TEXR |
MISS |
No |
|
9990537313 |
20030503 |
16 |
Female |
XXTESTPATIENT-TFAD |
MISS |
No |
|
9990537364 |
20010518 |
18 |
Female |
XXTESTPATIENT-TFAH |
MISS |
No |
|
9990569479 |
19760518 |
43 |
Female |
XXTESTPATIENT-TJIN |
MRS |
Yes |
|
9990569401 |
19750721 |
44 |
Female |
XXTESTPATIENT-TJIH |
MS |
Yes |
|
9990539685 |
20010627 |
18 |
Male |
XXTESTPATIENT-TFIK |
MR |
Yes |
|
9990539642 |
20000917 |
19 |
Male |
XXTESTPATIENT-TFIG |
MR |
Yes |
|
9990539596 |
19950125 |
24 |
Male |
XXTESTPATIENT-TFIC |
MR |
No |
|
9990539502 |
19831220 |
36 |
Male |
XXTESTPATIENT-TFHU |
MR |
No |
|
9990539537 |
19731203 |
46 |
Male |
XXTESTPATIENT-TFHX |
MR |
No |
|
9990539693 |
19661027 |
53 |
Male |
XXTESTPATIENT-TFIL |
MR |
No |
|
9990539634 |
19550608 |
64 |
Male |
XXTESTPATIENT-TFIF |
MR |
No |
|
9990539553 |
19540324 |
65 |
Male |
XXTESTPATIENT-TFHZ |
MR |
No |
|
9990539499 |
19410707 |
78 |
Male |
XXTESTPATIENT-TFHT |
MR |
No |
|
9990539510 |
19360512 |
83 |
Male |
XXTESTPATIENT-TFHV |
MR |
No |
Follow the process above with these numbers, to test your processes for preparing, sending and receiving files. Create a .dat and .ctl form and send them to the service. The returned file should then contain the NHS numbers which have no opt-out registered.
Do not enter test data into live patient systems
The test data provided here must only be used as described here. Test data should not be used for any other purpose, or introduced into systems including real patient data.
Risks include:
- confusion between real patient and test data which could result in real data being recorded against a test record and vice versa
- test data booked in to real clinical appointment slots, reducing the number of slots available for real patients
- inaccurate reporting for statistics or payments
- confusion for users switching between live and test environments
Last edited: 9 June 2026 1:09 pm