Part of National Child Measurement Programme IT system user guide part 3: Pupil data management
Entering pupil data
Pupil data can be entered by manual input or uploading from other sources such as electronic Child Health Systems.
This table shows the data items required along with any relevant notes such as validation rules.
Mandatory items are marked with a *
Non mandatory items required for data matching are marked with **.
| Field | Description | Format/example |
|---|---|---|
| URN*2 |
URN (Unique Reference Number) is a school identifier. A school's URN changes if the school type changes (such as from Community school to Academy). For uploaded data, URN must match a URN on the "Schools" screen. For manually entered data the URN is populated based on the school grid that data is being entered into. |
NNNNNN 123456 |
| DfE number*2 |
DfE (Department for Education) Number is a school identifier, sometimes referred to as LAESTAB (since it combines the LA code with the school's Estab code). A school's DfE Number does not change if the school type changes. DfE Number is only mandatory when adding new schools. It is not required in upload files since it is automatically populated based on the school URN. |
NNN/NNNN 894/2200 |
| Date of Birth* | Child's date of birth (DoB). The NCMP system only accepts data from children aged 4-5 and 10-11 years and so the DoB must be within ranges shown in the reference data. | dd/mm/yyyy 17/11/2016 |
| Sex* |
For uploaded data the following responses are accepted: M, F, m, f, MALE, FEMALE, male, female, Male, Female. For manually entered data sex is selected from a dropdown menu. |
M, F, m, f, MALE, FEMALE, male, female, Male, Female |
| Height* |
Child's height in centimetres to the first decimal place, that is the nearest 0.1cm. Ranges for which heights will be rejected, or generate warnings due to being extreme, are shown in the reference data. |
120.4 |
| Weight* |
Child's weight in kilograms to the first decimal place, that is the nearest 0.1kg. Ranges for which weights will be rejected, or generate warnings due to being extreme, are shown in the reference data. |
20.6 |
| Date of Measurement* |
The date on which the child was measured. Children can be measured from 1st September to the 31st August. August and weekend dates of measurement will generate warnings |
dd/mm/yyyy 15/09/2021 |
| First name** | Please provide in full without abbreviations full without abbreviations | No restrictions on format |
| Last name** | Please provide in full without abbreviations | No restrictions on format |
| Address** | Please provide in full without abbreviations | No restrictions on format |
| Postcode** | Child's postcode. Please do not provide the school postcode in cases where the child postcode is unavailable. |
GIR 0AA |
| NHS number** | The NHS number is 10 numeric digits in length. The tenth digit is a check digit used to confirm its validity as detailed in the reference data | 4505577104 |
| Ethnicity | A full set of accepted codes are shown in the reference data. Four ethnicity code types are accepted: NHS codes; DfE extended codes; Rio CHS (Child Health System) codes; SystemOne CHS codes. | See reference data |
| Pupil ref | For LA use only (NHS England does not access or use this data item) | No restrictions on format |
| Pupil notes | For LA use only (NHS England does not access or use this data item) | No restrictions on format |
| Parent telephone | For LA use only (NHS England does not access or use this data item) | No restrictions on format |
| Parent email | For LA use only (NHS England does not access or use this data item) | No restrictions on format |
Manual input of pupil data into the NCMP IT System
1. From the NCMP Public Home page, click Schools on the top menu.
2. Click the pupil grid link for the school where you would like to add the data.
3. The pupil grid for the selected school is shown. The list will be empty if no pupils have been added.
Pupil details pop-up for
You can now enter pupil details into a pop up form as well as directly into the pupil grid by clicking edit on the pupil grid.
4. The pupil grid is made of 5 tabs
- child identifiers (default)
- address details
- measurement
- pupil notes
- parent contact details

5. To add a new pupil manually click the add new pupil button and a new blank role is added to the pupil grid.
6. The following fields are mandatory indicated by a * and are located on the child identifiers tab. It is not possible to save a record with missing mandatory data. (date of birth and sex).
The School Year field is calculated based on the entered Date of Birth (DoB). The DoB must be within the range set for the selected collection year.
See the reference data file for details of the exact date ranges for present school year.
The School URN is automatically entered for the selected school.
7. Once the 2 mandatory fields and any other pupil data have been completed in this, or in any of the other four tabs, either
- click back to school list or
- click add new pupil to add more pupils
The data is automatically saved to the database when exiting a field.

Any pupil records with invalid or missing data are shown with red shading and the invalid/missing data is highlighted with red borders. The reason for the error is shown if you hover the mouse pointer over the highlighted box. Examples of invalid data are
a) empty mandatory field
b) a date outside the range set for the collection year.
Delete a pupil from the pupil grid
To delete a pupil from a school:
- Within the pupil grid for the selected school, click X for the pupil to be deleted.
- You will be requested to confirm this action. Click yes to confirm.
Uploading pupil data into the NCMP IT System
Data from other systems, such as Child Health Information Systems, can be uploaded into the NCMP IT system, saving time spent on data entry.
When creating your CSV file it must follow these rules
- be saved in CSV format with 22 columns of data in the exact order and titles as shown below
- all columns must have field names in the first row
- do not enter any data except for a column heading in the first column. This column is for the NCMP system ID. If you want to add your own child ID number then please enter this in the third column
- columns can be empty of data except for data of birth, sex and school URN which must contain valid date for each pupil.(shown with *)
You can also also export data from the system and amend/add data before re-uploading. In this case the field names and “Id” column will be populated (as shown below). Please do not change the ID numbers as these will be used to match the records that you are uploading with the records in the system.
Sometimes NHS Number is displayed with spaces in it, for example, 1234 5678 90.
If this is happens, please ‘find’ and ‘replace’ to locate the space (by hitting the space bar once, and replace with nothing in order to remove spaces).
You can also upload data from the NCMP data entry aids. You can learn more about this process by reading the producing offline data capture tools. The data is initially uploaded to a reviewing/staging area where the data are validated and any errors corrected.
In addition to the two mandatory fields required (Date of Birth & Sex), the upload file must contain valid School URNs, otherwise the file will be rejected and the upload aborted.
When collecting school data, please ensure you are using the 6 digit URN code for the school, ie 457239. The 7 digit LA/Establishment number will not be accepted into the NCMP system and will generate error messages. Please refer to your school list in the NCMP system to familiarise yourself with the layout of the School URN and ensure they match with your pupil data files. If you retrieve this information direct from your Child health system, please ensure that it is the 6 digit number you specify from your system provider.
If all School URNs are valid, but some other data is invalid for example. Date of Birth), the data is uploaded and you can make the required corrections in a staging/preview grid before the upload is complete. Alternatively, you can make the amendments in the source file and reupload the file into the system.
There is no limit to the number of times you can upload the pupil file to the system - each upload will overwrite the previous matching pupil records. However please note, this does not include updated school URNs (for example, if the child has moved schools), this will create an additional record.
When you upload data for records that have previously been entered, either pre or post-measurement, the system will match records using the following hierarchy (moving on to the next option if there is no data entered for the relevant field):
1. NCMP system ID (this is generated when records are exported from the system).
2. LA pupil reference
3. NHS number
4. first name, surname, sex and date of birth
When the system finds a match it will update any fields that have changed but blanks will not overwrite existing data. You can be confident to upload your records as long as you are content that any fields that are different in your new upload file will overwrite the data in the system.
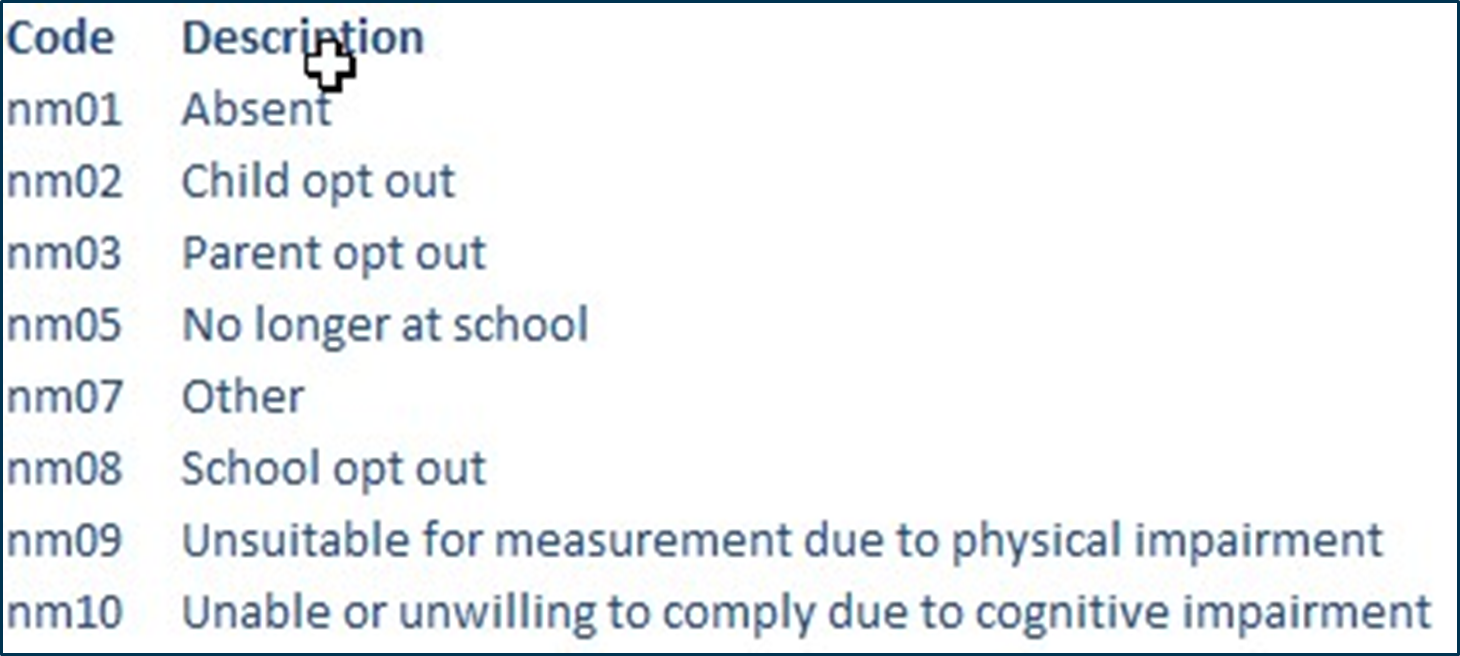
If you want to upload reasons for non-measurement, please use the following codes
Upload pupil data
- Navigate to the Pupil Data tab in the top menu.
- Click the browse file button, to search for the CSV file to upload from your computer.
- Navigate and select the file to upload.
- Click open.
- The filename of the file to upload is shown, click upload.
- The uploaded data is shown in a staging preview grid. So you can review the data and correct any errors. You can
- change the number of pupils per screen
- sort the pupils by a specific field in ascending or descending order
- delete a pupil
- Correct any errors.
- If you are happy with the data and no errors are showing click complete upload. Or cancel the upload by clicking cancel upload.
- If you have completed the upload, you will then receive a report detailing the number of new pupils uploaded, existing pupils updated and the total records in the CSV file.
- Click the View uploaded pupils’ link to see the new pupils added.
Last edited: 27 August 2025 4:44 pm