Part of Data Landing Portal guidance for specification managers and data recipients
Logging in as a data specification manager
If you log in as a data specification manager, DLP will open at the specifications screen.
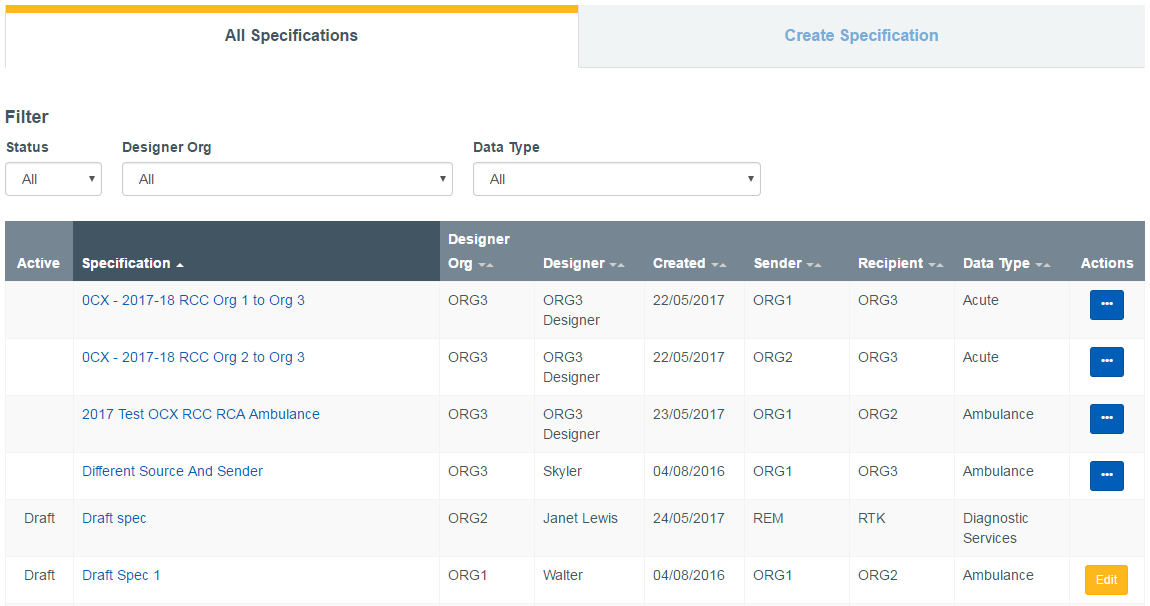
Creating new data specification
1. create specification. Click the create specification tab on the Specifications screen. The new data specification screen will open.
2. Complete data specification fields. To submit a new specification, all of the required fields must be populated.
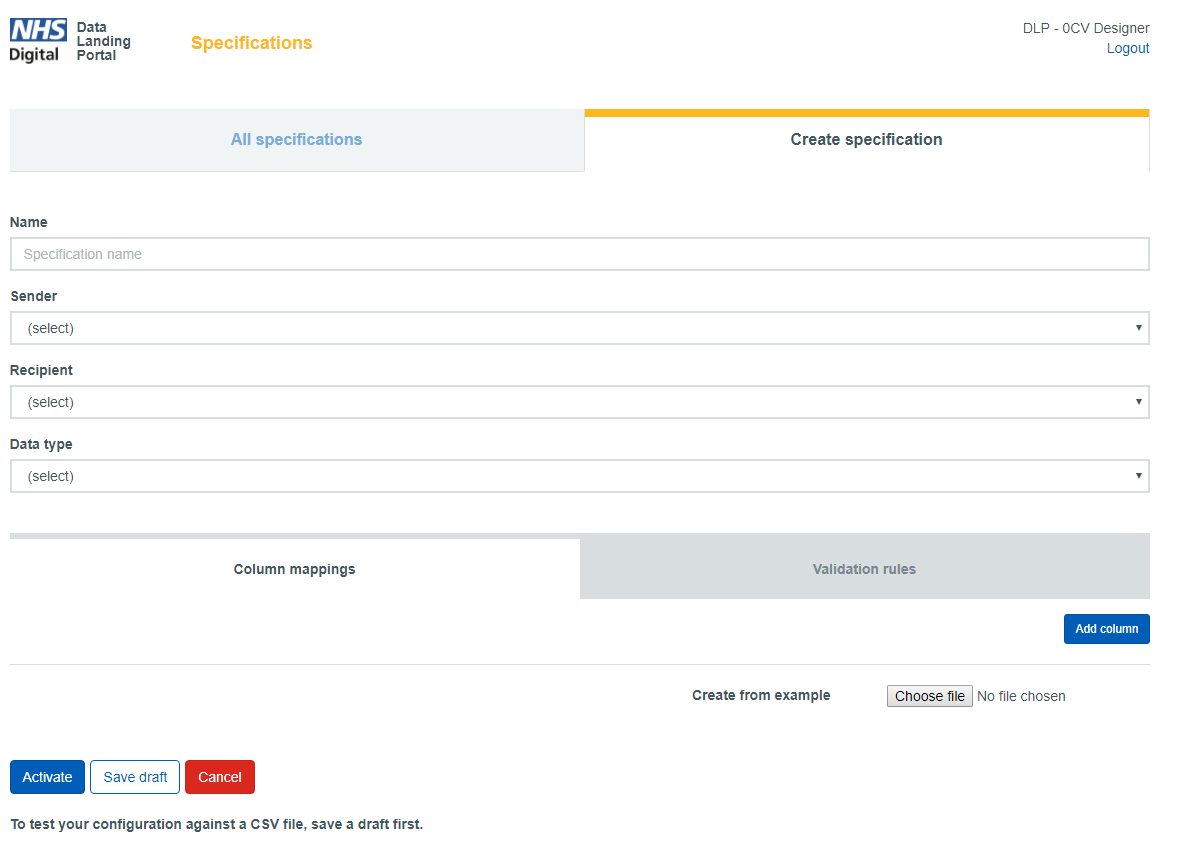
- Name: is a free text field, but we encourage Data Specification Managers to use meaningful names so that specifications can be easily identified. Note that you cannot use the same name across multiple active specifications for the same sender/recipient combination.
- Sender is selected from a drop down list of the permitted sender organisations.
- Recipient is selected from a drop down list of permitted recipient organisations.
- Data Type is selected from the data type drop down list
You now have the option to manually set up the columns for your specification, or to create it from an existing example or template.
Manually adding columns
3. Add Columns: Click the add column button. Users can add a column at a time or add the required number of columns first and then specify the name and mapping of each column. For every column that is added, a corresponding validation rule will appear under the validation rules tab (please refer to the ‘adding validation rules’ section).
4. Complete data specification mapping: Populate the Column field text field with the corresponding column header. So if your Column A is called ‘NHS Number’ you will need to use the exact same name here (including whether you use spaces or underscores). Populate the Maps To field with a value from the drop down list of potential mapping options. The list contains different, known PCD types or specifies where PCD is not present and can ‘pass through’.
The naming and mapping of each column must be repeated for each column in the specification. Column headers should NOT be duplicated; a message will alert a user when a column header has been used more than once within a specification.
5. Remove unwanted columns: Click the Remove button to remove unwanted columns.
6. Add in any validation rules: see ‘adding validation rules’ section below)
7. Submit: Click Activate when the additional columns have been completed and you want to make the specification available, or choose Save Draft if you want to come back and edit it later. Note that it can only be seen by the sender organisation once it has been activated. N.B. Validation rules can be amended after a specification has been activated (please refer to the ‘Adding Validation Rules’ section below.
Creating a specification based on an existing template
Alternatively, if you have an existing template for the data specification, you can browse to this by clicking on the Choose File button and use this to auto-populate the column headers.
You will still need to map the columns as described in step 4 above, though DLP will attempt to map the fields based on the column name and the data in that column. After this, follow step 5 onwards as described above. Please note that validation rules will still need to be manually applied.
The reminder dialog will remind the data specification manager that PCD must be correctly mapped. If changes need to be made the data specification manager can click return to return to the specification screen and make the required amendments.
Alternatively, Click ‘confirm’ to create the specification. After submitting the specification, the specification summary screen will be displayed and the newly created data specification can be viewed on the all specifications tab. From here you can also toggle whether the specification is Active or Inactive, or use the icon under the Actions column to edit specification, replicate specification, download template or view full specification.
Replicating an existing specification
If you have an existing specification that already has all the columns and validation rules that you require, and need to replicate this for another specification, you can do this by clicking the replicate specification button when viewing the specification. This will also replicate any validation rules that have been applied.
Note that you will have to make any amendments required to this replicated specification before activating it, and that two active specifications for the same sender/recipient cannot have the same name.
Adding validation rules
For any column created under the column mapping tab, a corresponding validation rule will appear under the validation rules tab.
To activate a validation rule, first check the tick box which appears to the left of the name in the validation rules tab. Next, select the rule type from the drop down (your options will be limited to those allowed by the column mapping). For some rules, you will also be asked to define the maximum length or maximum precision and scale allowed when submitting values against the column specified (precision and scale are explained in more detail in the rule type table further down).
For each validation rule you will also need to define the action that will be triggered if a submitted value does not match the format specified and if blanks are allowed. This is done from the ‘select action if failure’ drop down.
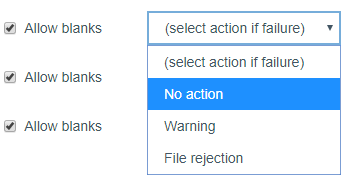
The ‘Allow blanks’ option will be selected by default. If it is unchecked, any blanks cells will cause the validation rule to fail. The possible actions in the event of a failure are:
- Do nothing: the value will pass through without triggering any further action
- warning: the value will pass through but will trigger a warning that appears in the interface and the generated validation report
- file rejection: the entire submission will be rejected
All these options are configurable by the DSCRO. Validation rules can be amended by clicking on the specification name and choosing Edit specification.
Validation report
For any submission that triggers no action, a warning or file rejection, a validation report will be made available to both the provider and the DSCRO. This report includes the cell location of any issues, the validation error, the format expected, and the action triggered.
For both DSCROs and providers accessing DLP via N3 and Smartcard, the report will contain details of the submitted value for each item that failed validation. Users accessing DLP via the NHS Identity method will see the column, but all the values will be removed.
Logout
Click the Logout button to exit the portal.
Last edited: 8 October 2020 6:08 pm