
AAL3 passkey private beta

We are running a private beta of an Android and iOS application that provides AAL3 passkey access to CIS2 Authentication.

The AAL3 passkey private beta is now live - register your interest.


The NHS England Identity and Access Management team is running a private beta of an Android and iOS application that provides AAL3 passkey access to CIS2 Authentication.

What is a passkey?

Passkeys allow authentication without passwords.

They work by using biometrics or a device's screen lock passcode. Most users simply tap with their fingerprint or look at their device’s camera to authenticate.

As an option for CIS2 Authentication, passkeys enable health and care professionals to log in with fewer steps and can reduce context-switching.

The AAL3 passkey application will allow registered users to access any application that supports non-smartcard authenticators via CIS2. This includes:

  • SystmOne
  • RIO
  • Lorenzo
  • EPIC

The AAL3 passkey app supports cross device authentication.

See a full list of applications that support CIS2 authentication.

The AAL3 passkey is downloaded to a user's phone, registered in Care Identity Management and then available to use for authentication. Full step-by-step guidance on registration and authenticating with a AAL3 Passkey is available here.

To register interest in the private beta please complete this form.


What you'll need for the private beta

You'll need:

  • a link to download the NHS CIS2 Passkey app (provided on request)
  • the app enabled within the device's settings

Android users will also need:

  • Android version 14 or above
  • your Google account email address shared with the Identity and Access Management team

iOS users will also need iOS version 17 or above.

How to register a passkey on an Android device

Installing the app

Make sure you've registered for the beta with the Care Identity team. You'll have received a link to download the app, which is not currently available in the public store.

Opening the app for the first time will trigger the setup journey. You'll first need to enable autofill to allow the app to manage passkeys on your device.

CIM register CIS2 Auth passkey Android enable autofill


Note: if this does not appear, you’ll need to navigate to the system settings manually to enable autofill.

You should then enable the CIS2 Auth Credential Provider app by toggling the setting on.

CIM register CIS2 Auth passkey Android enable app in preferred services


Note: if the list of 'Additional services' does not show the app, you may click the preferred service and select it, before restoring the original preference.

Once you've enable the app in the settings, press the back button to return and you'll be asked to accept the app's terms and conditions. Please note the content for the terms and conditions does not yet display in the app, but you must select 'Accept' to proceed.

You'll then see the app's main screen, with no passkeys shown.

CIM register CIS2 Auth passkey Android app home screen no passkey shown


Registering the passkey

This guidance explains how a Registration Authority user can register the passkey on another user's Care ID. To register the passkey on your own profile as a non-Registration Authority user, follow the guidance on how to self-register the CIS2 Authentication passkey app.

You'll need to set up a meeting with your user, either via video or face-to-face. The passkey registration must be completed in your presence.

They will need to have Bluetooth enabled on their device.

From the Care Identity Management home page, choose 'Find an existing user'.

CIM home page find an existing user highlighted


Enter the user's details and select 'Search'.

Care Identity Management find an existing user


Choose 'View profile' on the right of the screen.

Care Identity Management user found


Go to the 'Authenticators' tab on the user's profile page and select 'Issue other authenticator'.

Shows a list of authenticators, with a button highlighted to Issue other authenticator


On the 'Select authenticator type' screen, select 'CIS2 Auth Passkey App (Android)' and 'Continue'.

Note: if the option does not appear, it's likely that the user already has the CIS2 Authentication Android passkey registered to their Care ID.

CIM register CIS2 Auth passkey select type Android highlighted


You'll now see a screen with instructions on how to register the passkey.

CIM register CIS2 Auth passkey Android instructions and register button


When you've read the instructions and are both ready to proceed, select 'Generate link'.

CIM 7.17 create a passkey link generated


Copy the link and send it to the user by email, or paste it into the chat function of the video call software you are using.

When the user opens the link on their Android device, they'll be asked to confirm that they want to save the passkey.

Important:

  • if the app shows the CIS2 logo at the top, the user should select 'Continue'.

CIM register CIS2 Auth passkey Android app create passkey CIS2 Auth logo shown


  • If the app shows anything else (e.g. Bitwarden), the user should select 'Save another way'.

CIM register CIS2 Auth passkey Android app create passkey Bitwarden logo shown


  • And then select CIS2 Auth on the next screen.

CIM register CIS2 Auth passkey Android app create passkey save passkey to CIS2 highlighted


Depending on your device settings you may now need to confirm your biometrics.

AAL3 passkey Android registration step 4


You should then see a confirmation screen.

CIM register passkey type 3 step 4


How to register a passkey on an iOS device

Installing the app

Make sure you've registered for the beta with the Care Identity team. You'll have received a link to download the app, which is not currently available in the public store.

The beta uses TestFlight to manage the app, so you'll need to install the TestFlight app before installing the CIS2 passkey app. You'll also be able to feed back information via TestFlight to the development team. Using your iOS device, download TestFlight here.

Opening the CIS2 app for the first time will trigger the setup journey. You'll first see some developer notes, then be asked to enable autofill to allow the app to handle passkeys. Select 'Enable AutoFill'.
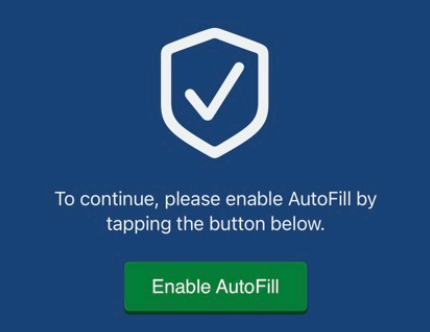
CIM register CIS2 Auth passkey iOS enable autofill


You'll be asked to accept the app's terms and conditions. Please note the content for the terms and conditions does not yet display in the app, but you must select 'Accept Terms & Conditions' to proceed.

You'll then be asked to confirm you'll allow the app to use Face ID. Select 'Allow'.
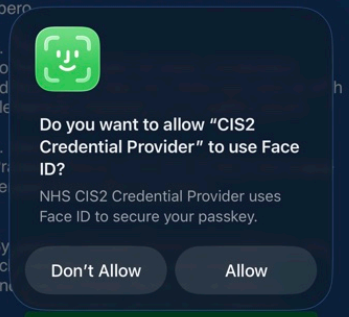
CIM register CIS2 Auth passkey iOS allow Face ID


Note: if this fails you can manually enable the app in the system settings under General > Autofill & Passwords.

You'll then see the app's main screen, with no passkeys shown.
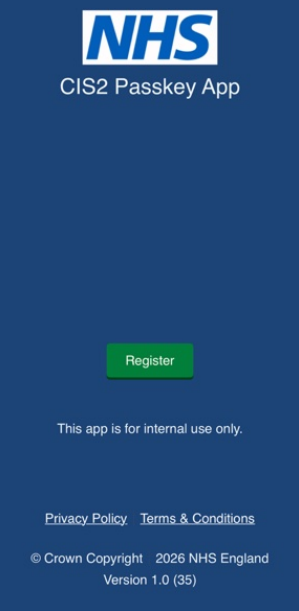
CIM register CIS2 Auth passkey iOS app home screen no passkey shown

Registering the passkey

This guidance explains how a Registration Authority user can register the passkey on another user's Care ID. To register the passkey on your own profile as a non-Registration Authority user, follow the guidance on how to self-register the CIS2 Authentication passkey app.

You'll need to set up a meeting with your user, either via video or face-to-face. The passkey registration must be completed in your presence.

They will need to have Bluetooth enabled on their device.

From the Care Identity Management home page, choose 'Find an existing user'.

CIM home page find an existing user highlighted


Enter the user's details and select 'Search'.

Care Identity Management find an existing user


Choose 'View profile' on the right of the screen.

Care Identity Management user found


Go to the 'Authenticators' tab on the user's profile page and select 'Issue other authenticator'.

Shows a list of authenticators, with a button highlighted to Issue other authenticator


On the 'Select authenticator type' screen, select 'CIS2 Auth Passkey App (iOS)' and 'Continue'.

Note: if the option does not appear, it's likely that the user already has the CIS2 Authentication iOS passkey registered to their Care ID.
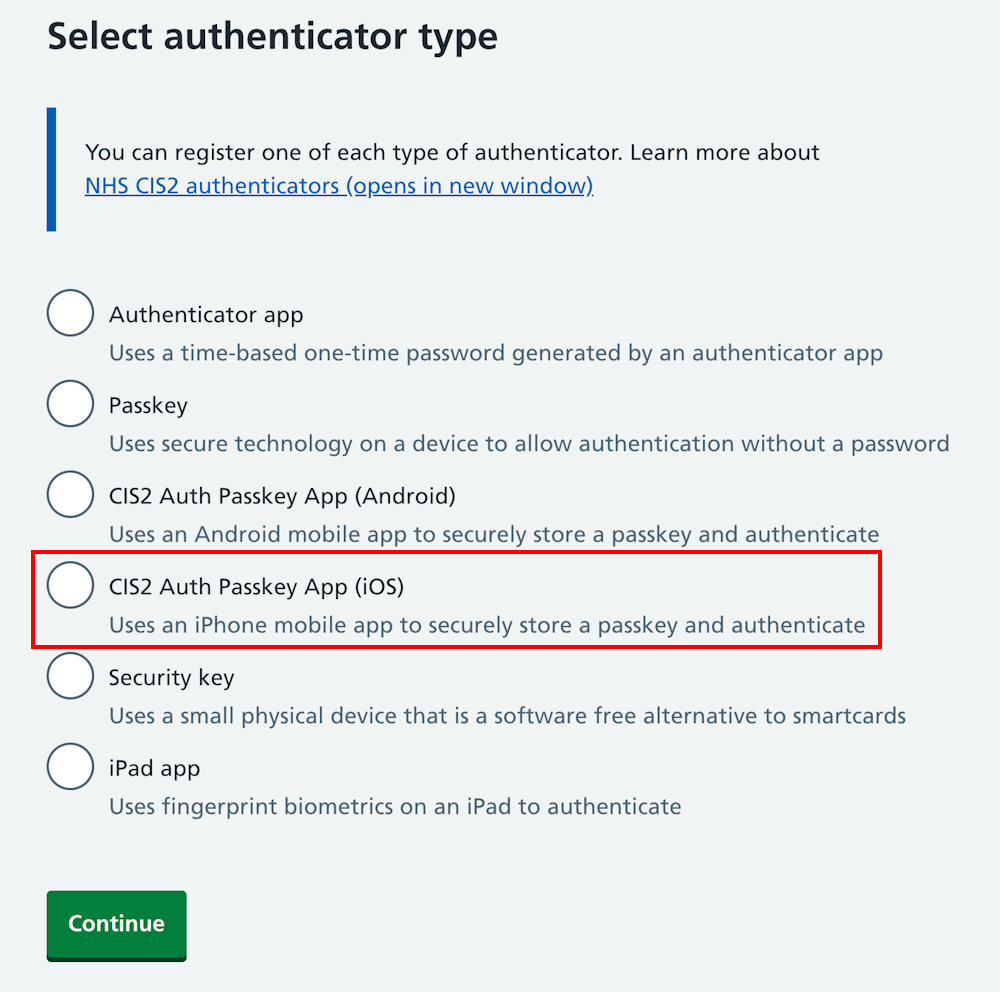
CIM register CIS2 Auth passkey select type iOS highlighted


You'll now see a screen with instructions on how to register the passkey.
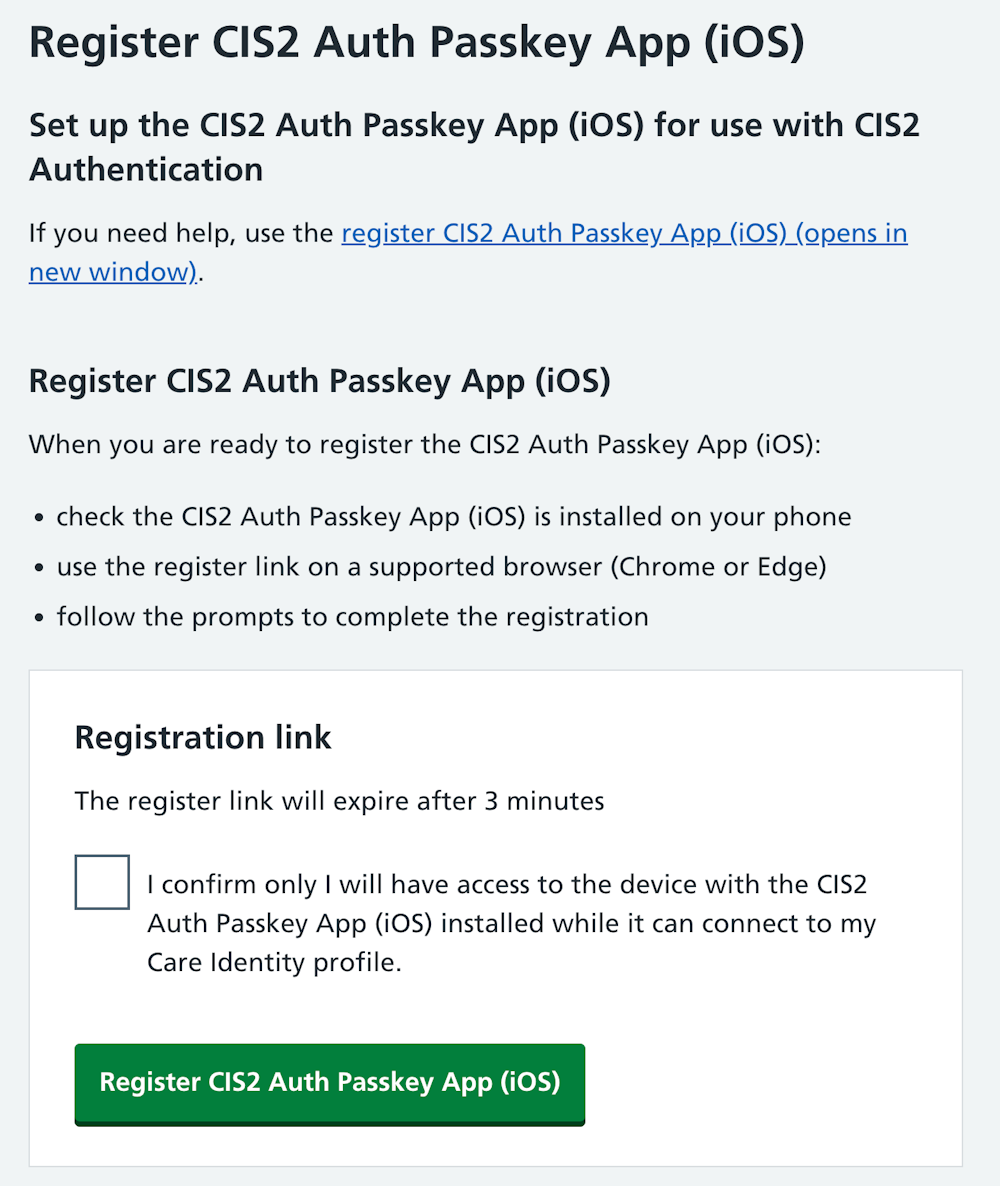
CIM register CIS2 Auth passkey iOS instructions and register button


When you've read the instructions and are both ready to proceed, select 'Generate link'.
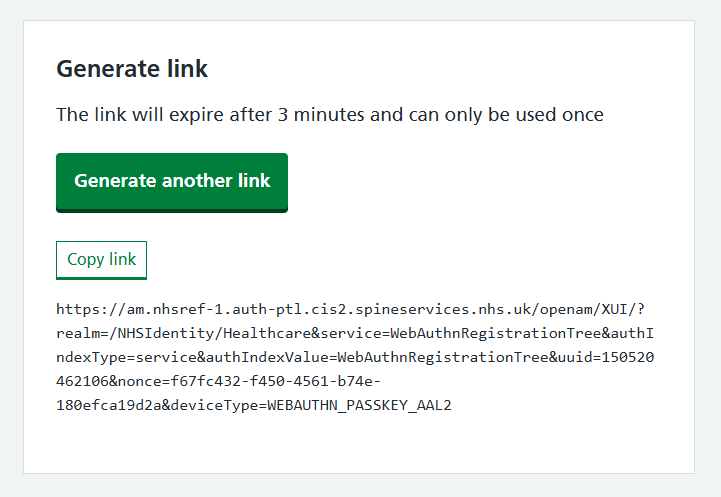
CIM 7.17 create a passkey link generated


Copy the link and send it to the user by email, or paste it into the chat function of the video call software you are using.

When the user opens the link, they'll go through a series of registration steps on their device.
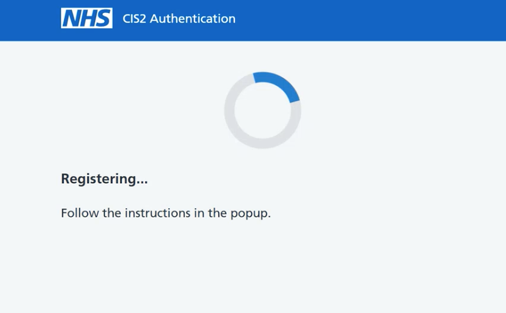
CIM register passkey type 3 step 1


The device will ask them to confirm their identity. Select 'Continue'.
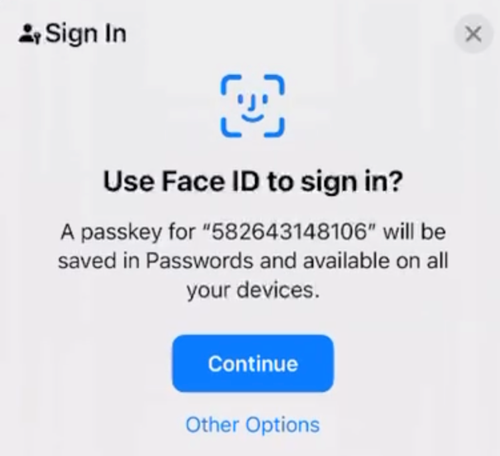
CIM register passkey type 3 step 2


iOS confirms it's them and continues registration.
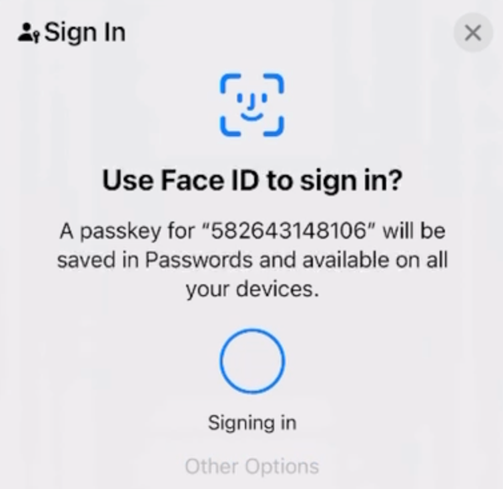
CIM register passkey type 3 step 3


When the device is registered you'll see a co nfirmation screen.
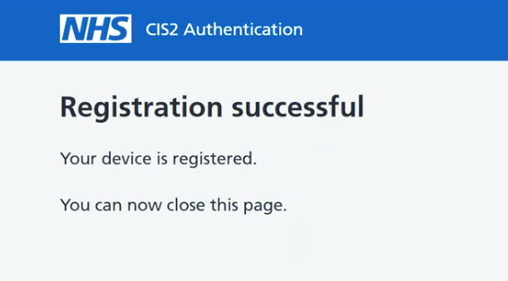
CIM register passkey type 3 step 4

How to check the device is registered

When the device has been registered you should be able to see it listed as active on the user's profile page in Care Identity Management.
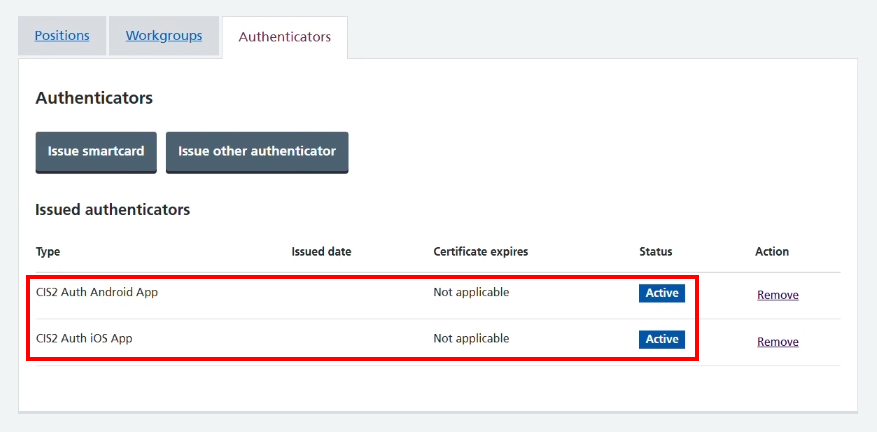
CIM register CIS2 Auth passkey authenticators tab both versions active and highlighted

The user will also see the passkey listed in the app on their device.
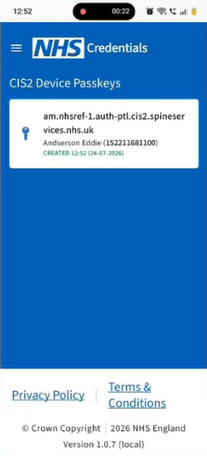
CIM register CIS2 Auth passkey Android passkey shown in app

How to authenticate

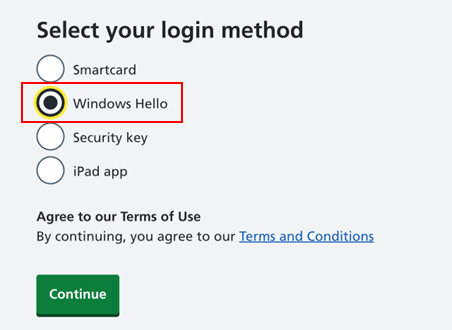
Once the device is registered, to authenticate the user should navigate to the service they're looking to access, and from the list of login methods select 'Windows Hello'.
AAL3 passkey Android registration step 5


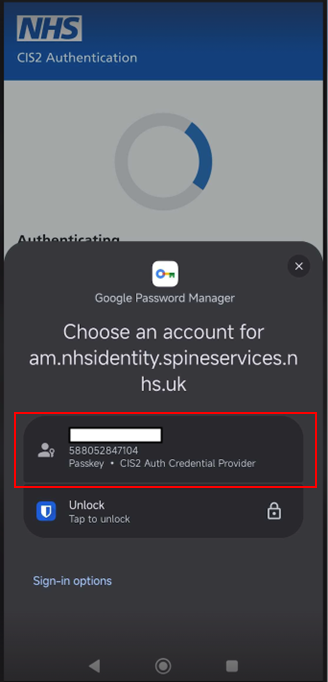
The user will then be prompted to either select a device, or if opened on your mobile device presented with a list of passkeys. They should choose the passkey listed as 'CIS2 Auth Credential Provider'.
AAL3 passkey Android registration step 8


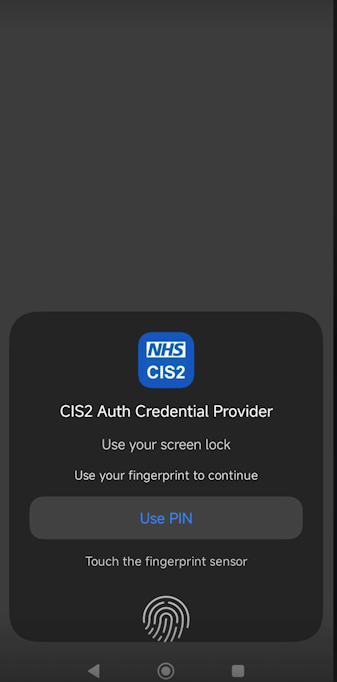
They can then authenticate using their chosen method of fingerprint or PIN.
AAL3 passkey Android registration step 9


Known limitations

  • During registration or authentication, if another logo appears in a pop-up in place of the CIS2 logo (e.g. Bitwarden), the CIS2 app has not been successfully set up. Refer back to the instructions above for your OS version to fix this issue.
  • Starting on a laptop or PC and scanning the QR code on the mobile device causes a number of issues:
    • no QR code or option to use mobile device appears - check Bluetooth and Windows Hello
    • registration fails with a 400_505 error - device or organisation privacy settings are blocking registration
  • On Android, if the default camera app does not recognise the QR code you will need to install Google Lens.
    When the application moves from private beta to full availability, users will need to reregister their device.
  • Some content, e.g. terms and conditions, has not yet been added to the app.

More information

To register interest in the private beta please complete this form.

For more information, please email [email protected]

Last edited: 5 August 2026 9:32 am