Data Access Environment set up guide
Find out how to get up and running with Data Access Environment (DAE).
Introduction
This guide is intended to help you set up your Data Access Environment (DAE) account, after receiving your account activation email and setting your DAE account password. It provides guidance on:
- system requirements
- setting up 2-factor authentication
- logging in using your 2-factor authenticator
- the DAE agreement selection screen
- troubleshooting
Contact us
If you have any questions about guidance or functionality, or are experiencing any operational issues, such as problems with system access, contact our National Service Desk on 0300 303 5035 or via email at [email protected].
For general enquiries, such as questions about Data Sharing Agreements (DSAs) or other data-related issues, email our contact centre at [email protected].
System requirements
Desktop supported browsers
The desktop browsers that we support are:
- Google Chrome (any version)
- Internet Explorer 10 (or later)
- Safari 5.0 (or later)
- Firefox 3.5 (or later)
- Opera 12 (or later)
Mobile and tablet supported browsers
The mobile and tablet browsers that we support are:
- iOS 5.0 (or later)
- Android 3.0 (or later)
- Chrome (any version)
- Firefox (any version)
- Network configuration
Firewall settings
The network port 443 (TCP outbound) will be required to be open on both your local PC firewall (if enabled) and on your network firewall.
This port is used to establish the secure connection via a web browser.
Whitelisted URLs
If your organisation has firewalls set up you may be requested to click through warnings in your browser.
The following URLs must be allowed (whitelisted) through your organisation’s firewall:
https://access.data.digital.nhs.uk
https://auth.idp.data.digital.nhs.uk/auth/realms/DAE/protocol/saml/clients/amazon-aws
Sites using proxy servers may need to add a proxy exception for the service for the connection to be successful. This is especially the case where traffic based on port numbers is separated across different proxy servers.
Password requirements
The DAE password:
- cannot match any of the user’s previous 24 passwords
- must have a minimum length of 14 characters long
- cannot be the user’s username
- must contain at least 1 uppercase character
- must contain at least 1 lowercase character
- must contain at least 1 special character (such as ?!#%$)
- must contain at least 1 numeric character
- is set to expire every 90 days
Setting up your 2-factor authentication
After receiving your account activation email and setting your password, you must now set up your 2-factor authentication to complete your account activation.
Choosing your 2-factor authentication method
DAE uses 2-factor authentication to keep your account secure. 2-factor authentication must be setup before you can start using DAE.
After setting up your 2-factor authentication you must use it each time you log into DAE.
The NHS England Cyber Security Team recommend using Google Authenticator or GAuth web-based authenticator as 2-factor authentication methods for DAE.
Use the following table to help you decide which authentication option to use:
| If you... | You should use... |
|---|---|
| Have a smartphone and are familiar with using apps | Google Authenticator on your smartphone. |
| Do not have access to a telephone | GAuth web-based authenticator using any browser. |
Setting up Google Authenticator
If you have a smartphone you can use Google Authenticator on your phone to activate your account.
Once you have set up Google Authenticator you must use this each time you log in to DAE.
To set up Google Authenticator on your smartphone:
- Go to the DAE log in page on your desktop.
- Enter your email address and password.
- Click Next.

The Mobile Authenticator Setup screen will be displayed.
Note: If you see a blank page when accessing DAE it is likely due to web permission restrictions. Contact your local IT team and request them to 'whitelist' the following URL:
https://auth.idp.data.digital.nhs.uk
If you continue to experience issues, contact the National Service Desk by email at [email protected].
Important: Do not scan the QR code from this guidance.
You will be presented with your own personal QR Code when you setting up your account.

- Go to the App Store on your smartphone.
- Search for Google Authenticator.
- Install the App on your smartphone.
- Open Google Authenticator on your smartphone.
Note - the following screenshots may vary depending on your smartphone.
- Tap Get Started.

- Tap Scan a QR code.

- Point your camera towards the QR code displayed on the Mobile Authenticator Setup screen on your computer screen.

If the QR code will not scan, please see the I am unable to scan the QR code for Google Authenticator sub-section in Troubleshooting.
- The QR code will read automatically without any buttons being pressed and a 6-digit code will be displayed on your smartphone.

Only scan the QR code once. You will know that the QR code has been read successfully as the page will change to display the authentication code.
Return to the Mobile Authenticator Setup screen on your computer.
- Enter the code on your smartphone (without the space between the numbers) into the text box on your screen. For example, you would type in 510761 as shown in the example below.
Wait for the countdown to begin at 30 seconds to give yourself enough time.
- Click Submit.

You have now completed setting up your 2-factor authentication.
Setting up GAuth web-based authenticator
If you do not have a smartphone you can use GAuth web-based authenticator, from any browser, to activate your DAE account.
Once you have set up GAuth web-based authenticator you must use this each time you log in to DAE.
To set up GAuth web-based authenticator:
- Go to the DAE log in page.
- Enter your email address and password.
- Click Next.
The Mobile Authenticator Setup page will be displayed.
Note: If you see a blank page when accessing DAE it is likely due to web permission restrictions. Contact your local IT team and request them to ‘whitelist’ the following URL:
https://auth.idp.data.digital.nhs.uk
If you continue to experience issues, contact the National Service Desk by email at [email protected].
- Click Unable to scan?
- Highlight and copy the 30-digit code. Make a note of the code if you are unable to copy it.

- Open your web browser and go to http://gauth.apps.gbraad.nl.
- Click on the pen icon in the top right corner.

- Click Add.

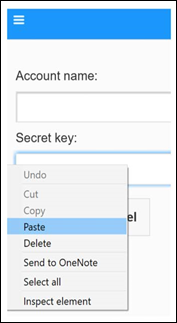
- Paste or type the 30-digit code in the Secret key field.
- In the Account name field enter a meaningful name, for example, ‘DAE’.
- Click Add.
The page will display a 6-digit code and a countdown.
- Click on the pen icon to stop editing.
The following page will be displayed:

- Wait until the timer (circled red) shows 30 seconds then copy or make a note of the 6-digit code.
Return to the Mobile Authenticator Setup screen.
- Paste or enter the 6-digit code.
- Click Submit.

You have now completed setting up your 2-factor authentication.
Logging in to your DAE Account
Once you have set up your 2-factor authentication you can log in to DAE.
Help keep data secure
You must ensure that:
- you inform NHS England when you no longer require access to DAE or any of the CDAs, by emailing [email protected]
- if you are leaving the organisation, your line manager emails [email protected] as part of the leaver's process, notifying us that you no longer require access to DAE
- you log in at least every 6 months (for security reasons we deactivate accounts that have been inactive for 6 months or longer)
Logging in with Google Authenticator
To log into DAE with Google Authenticator:
-
Go to the DAE log in page.
-
Enter your email address and password.
-
Click Next.
The 2-factor authentication screen will be displayed.

- Open Google Authenticator on your smartphone.
- Enter the code from the smartphone into the box on the 2-factor authentication screen (without the space between the numbers). This must be done before the 30 second timer runs out.

- Click Log in.

Refer to the relevant DAE user guidance for details on how to complete the login to your required analytical tool.
Logging in with GAuth web-based authenticator
To log into DAE with GAuth web-based authenticator:
- Go to the DAE log in page.
- Enter your email address and password.
- Click Next.
The 2-factor authentication screen will be displayed.
- Go to https://gauth.apps.gbraad.nl/.
- Wait until the timer (circled red) shows 30 seconds then copy or make a note of the 6-digit code.
- Paste or type the code into the Authentication code field.
- Click Log in.

Refer to the relevant DAE user guidance for details on how to complete the login to your required analytical tool.
DAE agreement selection screen
When completing the login to your required analytical tool, the DAE Agreement Selection screen will be displayed. This screen allows you to select the Data Sharing Agreement (DSA) which permits access to the required analytical tool. When the DSA is selected you will have access to the data within that agreement.

The information to the right of the DAE Agreement Selection screen will populate once you select an agreement.
The following information displays:
Name
The username of the person logged in to DAE.
The name is the part of your email address that precedes the ‘@’ sign. For example, for the email address [email protected] the Name would be Firstname.Surname.
Agreement
The most recent DSA that has been selected and submitted. The data that you can access will be specific to the DSA selected.
Collaboration database
The database to which you write, and share, your results. This is dependent on the DSA you currently have selected.
Data Out
Depending on the terms agreed in a DSA, some users are required to have their outputs reviewed by an Output Checker in our Safe Output Service before they can be downloaded. Other users are permitted to export and download outputs without checks. This is to ensure data protection and patient confidentiality.
The Data Out field displays your export permissions.
The different permissions are:
- ESCROW: Downloads are available. Your export request will be reviewed by the Safe Output Service
- Yes: Downloads are available. Your export request will not be checked by the Safe Output Service and will be automatically downloaded to your AWS S3 account
- No: Downloads are not available
Roles
The level of permission assigned to the user.
The different roles are:
- user: The default role for every DAE user, regardless of the level of access or tools assigned
- data-analyst: The user has been added to the data-analysts group in Databricks and has access to a personal database
- data-manager: The user has been added to the data-analysts group in Databricks and is granted certain permissions in Databricks such as access to the data-manager clusters and code-promotion
- cpas-publisher: This role allows you to run specific Capacity Planning and Analysis System (CPAS) jobs in Databricks, namelycpas_publish and cpas_unpublish
- tableau-creator: The user has access to a Tableau Creator license (for audit purposes only)
- tableau-explorer: The user has access to a Tableau Explorer license (for audit purposes only)
Permissions status
This field shows whether the permissions for the DSA you have currently selected have been successfully applied.
The message 'Permissions applying...' will display when you select your DSA. If successful, after 1 minute the message 'Permissions successfully applied’ will display, showing that your permissions have been applied.
You will not be able to select a different DSA until the permissions for the currently selected DSA have been applied.
If the message Permissions failed to apply is received it may be that Databricks is unavailable, or there are issues with the clusters. We recommend that you re-submit the DSA. If the problem persists, contact the National Service Desk.
Troubleshooting
I am unable to scan the QR code for Google Authenticator
If you are unable to scan the QR code, you can manually enter this. Follow the instructions below and then follow the 2-factor Google Authenticator set up instructions.
- Go back to the Mobile Authenticator Setup screen and click Unable to scan?
- Highlight and copy the 30-digit code. If you cannot copy it, make a note of the code.
How do I delete an authentication account?
If you are using Google Authenticator:
- Select the three dots in the top right corner.
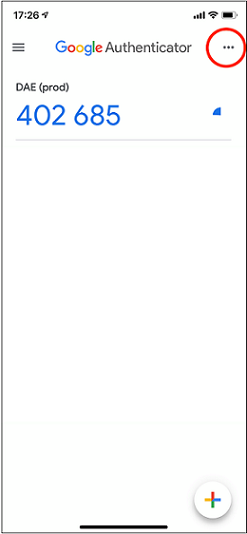
- Select Edit from the pop-up.

- Select the account you want to delete by tapping on the pen to the right of the account.

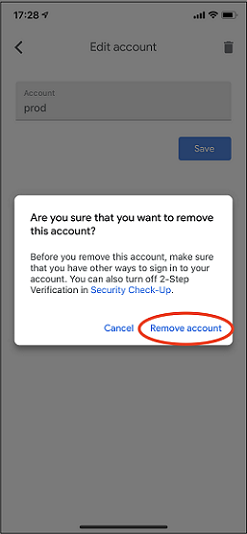
The account you have selected will be displayed.
- Select the delete icon in the top right corner.

A warning message will appear.
- Select Remove account to delete the account you have selected.
- You will return to the Get Started screen where you can now set up 2-factor authentication for another account.
If you are using GAuth Web-Based Authenticator:
- Select the pen in the top right corner of the screen to enable editing.
- Select the cross aligned with the entry you want to remove.

My 2-factor authentication code is not being accepted
If the 2-factor authentication code displayed on your smartphone returns an invalid code error message, you may have a time and date mismatch between your smartphone and desktop computer.
If they are different, follow the steps below to correct this issue:
- Check the time and date on your smartphone settings.
- Check with your computer to see it matches.
- If they do not match, you must change the time and date in your Smartphone Settings.
If you have an Android smartphone you can sync the time and date with the Google Authenticator app:
- Go to the main menu on the Google Authenticator app.
- Click Settings.
- Click Time correction for codes.
- Click Sync now.
How do I reset my 2-factor authentication
To reset your 2-factor authentication contact the National Service Desk by email at [email protected].
I am using a new device with 2-factor authentication
If you need to use a new or alternative device for your 2-factor authentication, contact the National Service Desk by email at [email protected] to request a reset. You will then be able to set up 2-factor authentication on your new device.
How do I check my internet connection speed
If you are experiencing issues, you can conduct a speed test to check the speed at which your internet connection is running. A possible site to use is https://broadbandtest.which.co.uk/.
Last edited: 6 March 2026 4:23 pm